Monday, December 20, 2010

Black Forest Cake

It's my husband's birthday and I let him choose what cake he'd like to eat on his special day like I always do and no surprise when he told me that he wanted a black forest cake ( like he does every year! ).

Nothing's complicated but the cake requires a few steps of preparation..I made the cherry filling and syrup in advance..then prepared the cake base and the whipped cream topping on the day I made and assembled the cake and I left the cake set overnight in the fridge, then served him the next day when he was back from his trip!

The recipe ( adapted from here )

The cake base..

80 g self raising flour
1/4 tsp baking powder
1/2 tsp baking soda
1/4 tsp salt
30 g cocoa powder
90 g caster sugar
50 g water
25 g evaporated milk
65 g canola oil
2 egg yolks
1 tsp vanilla extract
3 egg white
40 g caster sugar
1/4 cream of tartar

Method :

1. Preheat the oven to 180c. Line the base of 8 inch cake tin with parchment paper. Sift the flour, baking powder, soda, salt and cocoa powder together into a mixing bowl and set aside.

2.  Combine the 90g sugar, yolks, water, oil, milk and vanilla in another bowl. Stir until incorperated and pour overthe flour mixture. Gently mix the dry and wet ingredients with a whisk until smooth. Set aside.

3. Beat the white and cream of tartar with electric mixer until foamy, then gradually add the remaining sugar one tablespoon at a time and continue beat on high speed until reach the soft-medium peak ( more than soft but not hard peak). Gently fold the white into the cake mixture until blended.

4. Pour the batter into the prepared tin and bake for 30-35 minutes or until a toothpick inserted from center comes out clean. Leave to cool on a wire rack for 10 minutes before turning the cake out and leave the cake to cool at room temperature before assemble.

Syrup ( for brushing top of layers ):


1/4 cup sugar
1/3cup water
2 tbsp Kirsch

1. Heat the water and sugar until boiled and a bit thick. Take off the heat and set aside until cool , then add kirch into the syrup.

Kirsch Whipped cream:

3 cups whipping cream
60 g caster sugar
2 tsp vanilla extract
3 tbsp Kirsch
1 tbsp gelatin dissolved with 2 tbsp hot water ( leave to cool )

Method :

Beat the cream, sugar, vanilla and kirsch together until soft peak then add gelatin and continue to beat until combined and set.

Cherry Filling:

1.5 cans dark cherry in syrup
3 tbsp corn stratch dissolved with 3 tbsp hot water
3 tbsp Kirsch

1. Put cherry along with the syrup into a saucepan. Heat until warm then gradually add the corn stratch mixture. Keep stirring until thick then take off the heat and leave to cool before adding the kirsch.

Assemble the cake :

1. Slice the cake into 2 layers. Brush top of each layer with the syrup. Spread the whipped cream over the bottom layer and top with most of the cherry filling ( leave fews for the topping) , then spread more whipped cream to cover the filling. Put the other layer on top and cover the whole cake with the whipped cream. Decorate the cake as desired ( I used chocolate shavings as seen in the photos!)..




Tuesday, December 7, 2010

Cheesy Crispy Cornflake Cookies

Cookie is normally not a thing that I'm really keen to make for some (strange) reasons which even myself still couldn't figure it out ! But on the other hand, whenever I come across an interesting cookie recipe, I could never resist giving it a try..:)

As for a verdict, to my surprise, it turned out to be a flavorful cookie which I was totally pleased with the outcome..

The recipe could be found here.


Monday, December 6, 2010

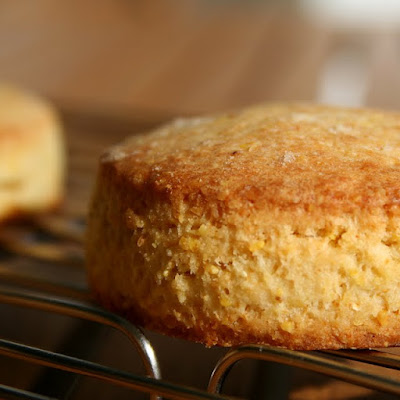
Cornmeal Biscuits with Honey Butter

I always couldn't resist giving a recipe a try when it's about cornmeal because it's one of my favorite ingredients. When I found this cornmeal biscuit posted on Serious Eats, I knew straight away what I'm gonna make for my husband as an afternoon teatime snack on the weekend!!

Anyway, my husband is not a big fan of cornmeal..so, I didn't really expect to get a good feedback back when I served him the biscuits along with the honey butter. But surprisingly, he responded positively and even my daughter, who is not really interested in this kind of baked good, also liked it !

As for myself, I couldn't agree more with what it's said on the post...and it would be a big mistake if  you decide to skip the honey butter!    


Wednesday, December 1, 2010

Vanilla Custard Cake

This cake has been a hit not only among Thai food bloggers but also my friends who have tasted it...and I never fail to get compliments every single time I make it ! Please give it a try and you will find out how gorgeous the cake is.. 


The recipe could be found here.


Monday, November 22, 2010

Cornmeal and Dried Mixed Herbs Crackers

When my daughter started whining and complained that nobody wanted to play with her on Sunday afternoon (after 6 hours of hanging around with me and her friends!) ..it happened to be the same time that I was looking at the foodgawker site and just saw this cracker on the front page while my husband lost in a newspaper..So I kind of ignored her and read through the post quickly, given not much time before she would do something worse to get our attention !

To make everybody happy..I found a solution and luckily, my daughter was successfully convinced to help me make these easy-peasy crackers ! By the time, the crackers were done, she forgot about playing and instead, was excited with her well-done job which means we were safe from playing such a boring game! lol..

The recipe could be found here ( I substituted dried mixed herbs for dried savory) 


Saturday, November 20, 2010

Baked Apricot Bars

Even though I've been cooking and baking lots of things for some time now I still find myself not feeling comfortable enough to make something without seeing an original product first! And that's why I had second thoughts about trying the apricots bars potsed on David Lebovitz's site because there's no picture of the bars shown!

However,my curiosity won in this case..it defeated my inner fear or inconfidence and in the end, I even managed to have enough guts to modify the recipe! Typical me..lol

And the result? I had some of the filling and topping...The apricot filling was so gorgeous and really worth your effort to make instead of using a paste as a substitute like David's suggested while the crumb topping was fabulously buttery ( consequence of adding more butter, I guess!)

You could find the recipe from here..


Cinnamon Rolls

Starbucks in HK used to sell cinnamon rolls which my daughter really liked it. Unfortunately, they abruptly discontinued the product for some reason and that kind of made me get into trouble because my 5 years old daughter kept asking for it everytime we visited a branch and complained why they didn't have it anymore!

Being a try-to-be good mum, I therefore offered myself to make a homemade one and promised her it would taste the same as Starbucks ( at least taste of sugar and cinnamon ! lol ) and luckily, that could stop her from nagging..

Honestly, it took me for a while to find the right recipe that made my daughter happy with the outcome and since I've found the one, my daughter never fails to be pleased everytime I make it !!

Here is the winner recipe..

Dough:


285g bread flour
50g caster sugar
1/2 tsp salt
6g instant yeast
85 ml warm milk
84 g water roux
40 g beaten egg
40 g soften unsalted butter

Filling :

6 tablespoon caster sugar
2 teaspoon cinnamon
some melted butter
some raisins

Egg+milk for egg wash

For the dough:


Mix all ingredients except the butter in the bowl and using a dough hook on low speed to form a ball. Add the butter bit by bit and mix until incorporated. Increase to a medium speed and knead the dough unitl smooth and elastic about 15-20 minutes. Place the dough into a lightly oiled bowl, cover with plastic wrap and let it rise until doubled in volume around 1-1.30 hours. Combine the sugar and cinnamon in a bowl for the filling.

Deflate the dough and divide into two pieces. Working with one dough at a time, roll out the dough into a  rectangle shape about 1/4 inch thick, brush with the melted butter and sprinkle half of the sugar and cinnamon mixture over roll the dough up tightly like a jellyroll. Cut into 7 pieces and place them into a buttered round tin ( 8 inches ). Repeat the same process with the second dough. Let them rise for another hour until almost double in volume. Preheat the oven to 180 c.

Brush the top and sides with eggwash and bake for 15-20 minutes. Transfer to a wire rack and let cool for a bit before serving.


Ps.this cinnamon roll has been sent to yeastspotting hosted by Susan of Wild Yeast.


Sunday, November 14, 2010

Rhubarb Crisp

I normally don't like anything sour but I strangely have a craving for it once in a while..The other day while I was doing some food shopping, I spotted packs of rhubarbs on a shelve and abruptly felt like eating it..so I simply grabbed 2 packs of them without any idea of what to do with it but I knew it wouldn't be that hard to come up with something nice !!

Back home, I looked at my recipes'file and surprisingly found many of rhubarb recipes which some were made and some have been left undone..so I opted to try for something new and my choice was from one of sources I could always rely on!

What I like about the recipe is that it doesn't call for much sugar used in the rhubarb filling like others..plus the method is quite simple. Anyway, I ended up modifying the recipe a bit and fortunately, the final outcome was not consequently effected ! Instead, it came out wonderfully and tasted just like the way I expected it to be..heaven !!

Rhubarb Crisp (adapted from here)

170 g cold butter, cut into small pieces, plus more for greasing pan
2 1/2 to 3 pounds rhubarb, trimmed, tough strings removed, and cut into 1 1/2-inch pieces (about 5 to 6 cups)
1/4 scant cup caster sugar
1 tablespoon orange juice
a zest from one (medium) orange
1 scant cup brown sugar
1 cup all-purpose flour
1 scant tsp cinnamon
1/4 tsp salt
1 cup rolled oats
1/4 cup pecans

1. Heat oven to 375 degrees. Grease an 8- or 9-inch square baking or gratin dish with a little butter. Toss rhubarb with white sugar, orange juice and zest, and spread in baking dish.

2. Put the brown sugar, flour, oat, cinnamon and salt in a mixing bowl, rub in the butter until it looks like small peas and just begins to clump together. Add the chopped pecans and mix just to combine.

3. Crumble the topping over rhubarb and bake until golden and beginning to brown, 35 to 45 minutes. Served warm with cream or ice-cream.


Wednesday, November 10, 2010

Sbrisolona

Sbrisolona means crumbly.. but in term of food, it's a traditional crunchy tart created around the 16th century in the Northern Italian countryside, outside of Mantua, sbrisolona was a popular dessert among poor families. In order to save money, they would prepare the tart by mixing cornmeal, hazelnuts and lard, instead of butter. Although this sweet is made with inexpensive ingredients, sbrisolona was so loved by the people that it was even served at the tables of the noble families of Mantua, including the Gonzaga family. In the noble households, the recipe was enriched with more expensive ingredients like sugar, spices and almonds, without moving too far away from the original characteristics of the dessert. According to tradition, this hard, yet crumbly dessert whould be broken into pieces and eaten with one’s hands.

I love the name of this tart at first sight..and when I've found out what it really is, I knew myself that it's a fat chance for not giving it a try even though it's not something my husband would like because he's not a big fan of cornmeal and almond..but I do ! so who cares ?? lol..

As for the outcome, I really like its crumbled texture..and you could feel it crunchy and chewy at the same time. I would highly recommend if you happen to fancy cornmeal and almond as I do..they are there in very single bit you eat!!   And to make yourself enjoy eating it even more..be sure you eat it in a traditional way ! Yummmm..

The recipe could be found here ( note : the only change I made to the recipe is to reduce the sugars )


Friday, November 5, 2010

Oatmeal Shortbread (again!)

Baking for me is not only a hobby but I also do it sometimes to release my stress caused by things gone out of control ! When I feel like baking something to cheer myself up, I always choose a things that is easy to make..thing that I know I can make it even when I'm out of my mind!!

Given nothing would be easier than cookie or shortbread..so I opted for shortbread this time and searched for an easy plus quick recipe on purpose. Without much time in hand, I decided to look at only first two results from my search and fortunately, they happened to be great ones (otherwise I would have got even more upset than I already was!). Simply mixed both and made my own version !

Oatmeal Shortbread ( adapted from here and here )   
Makes 16 bars

1 C AP flour
1/2 C rolled oat, plus a bit more for garnish
1/2 t salt
2 T sugar
2 T brown sugar
6 oz (1 1/2 sticks) cold butter, cut into small pieces
1 t vanilla
demerara sugar to sprinkle

Methods

1.Preheat oven to 325. Spread oats on a rimmed baking sheet. Toast until fragrant and lightly browned, 4 to 6 minutes. Let cool completely.

2.In a food processor, combine flour, sugars, salt, and 1/2 cup cooled oats; process until finely ground, 1 minute. Add the vanilla and butter. Pulse until mixture is the consistency of coarse meal. Transfer to an 8-inch square lightly greased baking pan; press firmly into bottom. Sprinkle remaining oats and demerara sugar on top, and press gently.

3.Bake until firm and lightly browned, 30 to 35 minutes. Using a paring knife, immediately score shortbread into 16 squares. On a wire rack, cool completely in pan; gently invert, and break along scored lines.