Wednesday, March 9, 2011

My Own Style Savoury Tarts..

I got some leftover dough from making Canadian butter tarts that turned out not good as I expected ( in fillings texture wise, not taste at all!) ..so, instead of making more of sweet butter tarts, I decided to do something different and came up with an idea of making savoury ones!

Anyway, I planned to use a commercial instant tuna spread as a filling in the first place but couldn't find any in a small supermarket where I stopped by. Given ingredients needed could be all found in the cupboard, I then had second thoughts about making my own filling!

Luckily, not only what I created was so easy to make but it also was edible! Honestly, it was much better than I thought..tasty and surprisingly went along very well with the tart base..:)

The recipe for the dough could be found here.

And what I used for my fillings are the following..

1 canned tuna in oil
3 crab sticks ( Japanese style) ,finely chopped
1/2 - 3/4 cup ( approximately ) real mayo      
a quarter of small onion, finely chopped
2 spring onions ( green part only), finely chopped
dried parsley , paparika, cayenne pepper ,curry powder, black pepper and caster sugar to taste

Mix everything together in a mixing bowl ..adjust all seasonings to match your own preferred taste.


Monday, February 28, 2011

Mexican Style Pork Roast

I handed the recipes of three different cuisines to my husband and asked him to choose what he'd like to be served for Saturday dinner and this pork was his choice which was coincidentally what I'd like him to pick!

I loved the dish once I first saw it posted here and was really keen to give it a go.. What attracted me is not only its scrumptious look from the photos but the cuisine and method also caught my attention!! Honestly speaking, Mexican food is one of my favorites, yet not what I cook regularly unless I've found an interesting recipe and this pork happened to be the case..

I adjusted amount of spices to suit my taste bud and opted for tortilla to serve along with it.. To make a meal perfect, I also had homemade guacamole , iceberg lettuce, sour cream and grated Parmesan on the table and let everybody make their own choices to assemble their dinner.. What a happy family meal!!

The recipe ( Slightly adapted from here )

7 dried bird chillies, stemmed and half of them deseeded
2 bay leaves

2 tablespoons apple cider vinegar

1/2 small white onion, roughly chopped

2 garlic cloves, chopped

1/4 teaspoon allspice

1 tsp mixed dried herbs

Pinch cloves

2 tbsps vegetable oil

1/2 tsp salt

1kg pork shoulder

Rehydrate the chillies by steeping in boiling water for 30 minutes. Drain, reserving 2/3 cup of water, transfer chillies and reserved liquid to a blender.

Tear bay leaves in pieces then add to the blender with the vinegar, onion, garlic, mixed herbs, cloves and allspice. Process to a smooth paste. Heat the vegetable oil in a heavy-bottomed pan, add the spice paste and fry for five minutes until dark in colour.

Heat the oven to 160 degrees, cut the pork into pieces that are roughly 3 inches thick and make 1 inch incisions all over the meat. Lay the meat on top of the paste and ensure that it is all well coated. Pour 1.2 cup of chicken stock around the meat and put the dish into the oven.

Baste the meat every 30 minutes. After 2.5 hours the meat should be tender and falling apart. If the liquid dries out at any point during the cooking time then top up with water.

Allow the meat to rest for 30 minutes before serving. Remove the fat from the cooking liquid and reducing it down to create a thick sauce to serve with the meat.


Tuesday, February 22, 2011

Malty and Chocolatey Cookies

Cookie is not a thing I'd particularly like to bake but it's not something that I would miss giving a try either if I find it interesting somehow!

These cookies happened to be the case because there are few ingredients called for that I had never used in my cookie baking era before..So, with all ingredients in hand, it didn't take me long to discover how scrumptious the cookies are!

The recipe ( adapted from here )

1¾ cups all-purpose flour


1 cup Horlick malted drink powder

¼ cup unsweetened cocoa powder

1½ teaspoons baking powder

¼ teaspoon salt

1 stick plus 3 tablespoons (11 tablespoons) unsalted butter, at room temperature

1/3 cup caster sugar

2 eggs

1 teaspoon vanilla extract

¼ cup whole milk

2 cups  chocolate-covered malted milk balls ( Maltesers), coarsely chopped

1 cup chocolate chips


1. Preheat the oven to 350 degrees F and line two baking sheets with parchment paper or silicone baking mats. Whisk together the flour, malted milk powder, cocoa powder, baking powder and salt in a medium bowl; set aside.

2. Cream the butter and sugar together on medium speed for about 3 minutes, until very smooth. Add the eggs one at a time, beating for 1 minute after each addition. Beat in the vanilla. Reduce the mixer speed to low and add half the dry ingredients, mixing just until it disappears into the batter. Mix in the milk, then the remaining dry ingredients, mixing only until they are incorporated. With the mixer still on low, or by hand with a rubber spatula, mix in the malted milk balls and chocolate chips.

3. Drop about 2 heaping tablespoonfuls worth of dough (I used a large cookie scoop) onto the sheets, leaving about 2 inches of space between each. Bake for 10 to 12 minutes, until puffed and set but still slightly soft to the touch. Let the cookies rest for 2 minutes before transferring them to a cooling rack to cool to room temperature. Store in an airtight container at room temperature.


Monday, February 21, 2011

Blue Cheese Biscuits

Time seems to fly very quick since the year has started while my blog has been left unupdated indeliberately..it's not that I have no time to cook and bake but there have just been lots of things happening to intervene! Anyway, I finally found my way back to blogging and do what I like here!!

Now speaking of the biscuits, I've found it on David Lebovitz's blog and what made me keen on giving it a try is a blue cheese which happens to be a favorite cheese of both my husband's and mine! Nothing is complicated to prepare the dough but you need some time to let it set in the fridge which I left mine overnight before baking!

As for a verdict, if you are a big fan of blue cheese , then this is one of things you shouldn't miss.. it's a real savoury biscuit and made a great snack..And I guess it would be great to serve it along with a bowl of soup or salad which I've planned to do when I make it next time!

The recipe could be found here..


Monday, January 24, 2011

Savoury Cheddar and Cornflake Cookies

I normally plan ahead what to do during daytime while my husband and daughter are off to work and school for each and every week. And when something unexpectedly happens to interfere with my set plan, I never find myself feel comfortable to cope with, especially things that force myself to do nothing but stay at home and today is the case!!

Anyway, it's not that bad cuz I've found these cookies and decided to occupy myself for a very short while to do what I like in the kitchen! As for the result, to my point of view, the cookie is a cross between shortbread and cracker..it's flaky..crispy , yet mildly chewy and buttery..and top of everything, it couldn't be better to be paired with cheese and sweet chutney !

Here is my version ( adapted from here )

Ingredients:


1 cup AP flour

114 g butter, softened

1 cup grated sharp cheddar cheese

1 cup cornflake

dash of cayenne pepper & paprika

Dried parsley & grated cheddar to sprinkle
Allow cold ingredients to come to room temperature. Preheat oven to 400°. Combine butter and cheese well with spoon or hands. Mix in flour, cayenne and paprika. Add salt and pepper to taste and fold in cornflake ( it will be crumbled while combined ). Roll into small balls and flatten; place on cookie sheet and sprinkle with some grated cheese and parsley. Bake 10-15 minutes. Let cool fully before serving; store in an airtight container or freeze. Be forewarned that these crackers are quite dry and flaky (hello, butter!), not moist and chewy like a cookie. Makes approx 18-20 cookies.


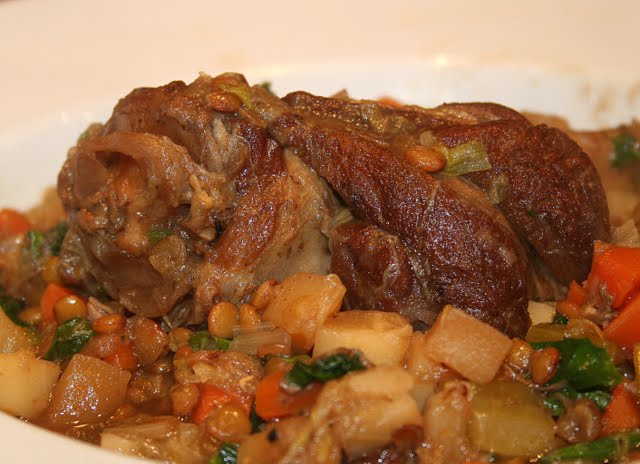
Braised Lamb Shank with Lentil

I've cooked something with lamb from time to time and I've noticed that most of them are made with tomato and/or wine sauce base which I sometimes thought it's quite boring to cook things in the same way. So when I came across this braised lamb shank on the site, I was undoubtedly keen to give it a shot..not only the way a lamb cooked (without tomato and wine!) that caught my attention but the recipe also calls for lentil which happens to be one of ingredients I like !

The recipe is so easy to make and kind of all-in-one dish because it contains lentil and lot of vegetables along with lamb shank, so you could simply serve it alone without any side dish as I did! And it really made  a perfect dinner for Saturday night!   

The recipe could be found here.


Sunday, January 23, 2011

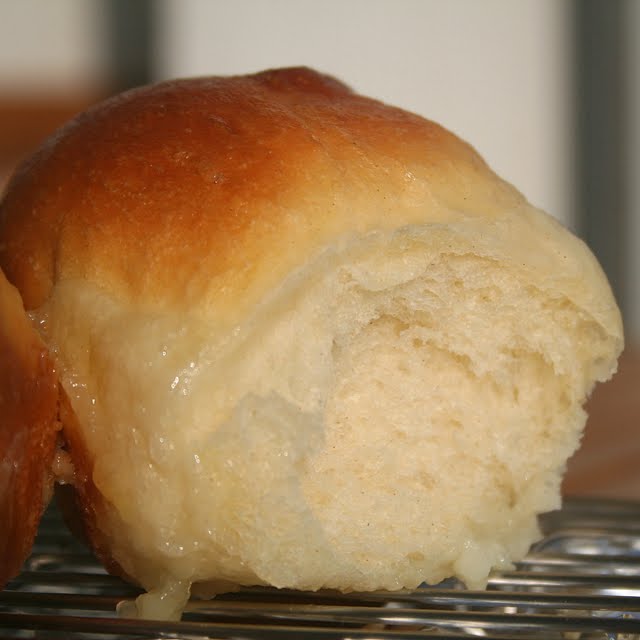
Pani Popo (Samoan Coconut Buns)

I've been busy with cooking and baking as usual and didn't realise until a friend of mine mentioned that it'd been more than a week that I haven't had my blog updated or posted anything on FB which is absolutely abnormal for me! So many things to do, so little time though.. anyway, here I am!

Now talking about these Samoan coconut buns ( known as pani popo ), it's not really new to me..in fact, it's quite some time when I've first seen a similar version (which is called lolo buns for Fijian!) and made it ! But as far as I rememeber, the recipe I tried calls for far too much coconut milk which made my buns were too soggy and not quite well baked at the bottom ..so I had no choice but counted it as an unsuccessful baked good and didn't really bother to make again until I recently found another recipe using less coconut milk which convinced me to give it a try..

Unlike the first attempt, this time I managed to make it successfully and beautifully with right amount of  coconut milk used! The bun is soft, mildly sweet and tasty..and I think coconut milk is really a key to make the bread much more interesting than any normal sweet bread..Even my husband, who is not a big fan of sweet / dessert that has coconut milk in, had two buns in a row !!        

The recipe ( slightly adapted from here )

Ingredients:
2 cups bread flour

¾ cup plus 2-3 tbsp warm milk

¾ tsp active dried yeast

1 tbsp sugar

¼ tsp salt

30g softened butter

½ cup thick coconut milk

3 tbsp sugar

1 egg – beaten for egg wash

Method:

1.Mix the lukewarm milk, yeast and sugar in the mixing bowl. Leave it for 10 minutes until the yeast started to form bubble.

2. In a mixing bowl, Whisk the flour and salt together. Add the yeast mixture and mix to form the dough. Add the butter and knead the dough for 10-15 minutes until it forms into a smooth ball . 

3. Let the dough rest in a greased bowl until doubled in volume, 1-1.5 hours. Prepare and grease an 8” x 8” square pan or a round baking pan.

4. Remove the dough from bowl and divide it into 9 round balls. Place them in the baking pan, cover and let it rest again until double in size.

5. In the meantime, mix the coconut milk with the 3 tbsp of sugar and heat it up to dissolve the sugar then set aside. Brush the buns with some egg wash. Pour the sweeten coconut milk over the buns and bake in a pre-heated 375 degree F oven for 30 minutes or until golden brown. Serve warm.


Ps. This bread has also been sent to yeastspotting hosted by Susan of Wildyeast.