Thursday, September 30, 2010

Orange Mousse Cake

This year in my daughter's new class at school, there are another two mums who coincidently have the same nationality as me and I couldn't help but be excited and happy about it because I never ever had this experience before since my daughter has gone to school ! And on top of everything, we happen to get along very well and have quickly grown our friendships in a short period of time which made me feel even better !

So it took less than a month before I got invited to join a lunch from one of the mums mentioned above and needless to say what  my response was. As always, I politely asked the host if I could take care of a dessert of the meal and my (new) friend was nice enough to accept my offer..this orange mousse cake is, therefore, a consequence !!

I chose the recipe from one of my trustworthy sources to avoid an unsuccessful result ( tastewise!). The cake has 3 different parts which consist of a cake base (a sponge cake), layers of orange mousse and orange jelly topping...sounds complicated but it's actually not! What you need is time and patience for waiting until the whole cake is done which I think the final outcome is truly worth your time and effort.

Anyway, I am writing this post before I bring the cake to our lunch..so there's no verdict to tell about my cake yet but hopefully, I would get some good feedback from my tasters. I'm getting my fingers crossed !! lol..

The recipe could be found here and I'd like to thank Khun Jum who has contributed lots of great recipes (and excellent demonstration! ) on her blog !


Sunday, September 26, 2010

Jamaican Lamb Curry

My concept of cooking and baking is to try as many  cuisines as possible because I personally don't really like cooking/baking things repeatedly ! And fortunately, my personal taster is not a picky consumer and keen on eating every single edible thing I make which perfectly matches my desire..:)

My husband was convinced to choose this Jamaican curry as our Saturday dinner over Ayam betutu ( my husband's latest favorite! ) because, of course, I wanted to give it a try after I've seen it posted on Simple Recipes !

The original recipe actually calls for goat meat which is not a normal thing we have in the family, so I substituted the lamb for it as suggested. Anyway, I also did some search to get more information about the curry and happened to find one recipe that I was interested in ! At the end , I decided to basicly mix two recipes ( the ones from Simple Recipes and from the site I've found from my search  ) and made it in my own way which turned out to be terrific. Consequently, we undoubtedly had a great and scrumptious Saturday dinner!         

Here is my version..

1 pound of lamb cut into pieces
2 scallions, very coarsely chopped
1 large onion chopped
3 red bird chillies, finely chopped 
1.5 teaspoons allspice
salt and freshly ground black pepper to taste
3 tablespoons of curry powder
1 tablespoon unsalted butter
2-3 tablaspoons canola oil
2 cloves of garlic, finely chopped
2 cups of chicken stock
half cup of coconut milk
1 tomato, thinly sliced
1.5 teaspoons dried thyme
3 new potatoes, peeled and cut into small chunks

 Method :

1. Make the curry powder, use regular curry powder and add the allspice to it. Mix the scallions, half of the onions, chillies, salt, black pepper, and about 3 tablespoons of curry powder mixture. Rub the lamb well with the mixture. Let the meat marinate overnight in the refrigerator.

2. The next day, heat the butter in a large pot, and add the oil. Add a tablespoon curry powder, and mix well. Add the garlic, the remaining onions, and brown them. Add the seasoned lamb to the mixture. Mix well. Add the stock, coconut milk,tomato and the thyme. Bring to a simmer and let it cook until the meat is falling-apart tender, about 2 hours. Once the meat is close to being done – tender but not falling apart yet – Add the potatoes and mix in. The stew is done when the potatoes are ( 30 more minutes ). Taste for salt and add some if it needs it. Serve the stew hot with some rice.


Tuesday, September 21, 2010

Kouign-amann

The first time I saw this lovely cake on this site, I immediately fell in love with it and knew myself  that nothing could stop me from making the cake! so what the heck is Kouign-amann ??


Kouign-amann  is a Breton cake. It is a round crusty cake, made with a dough akin to bread dough with sugar sprinkled between layers. The resulting cake is slowly baked until the butter puffs up the dough (resulting in the layered aspect of it) and the sugar caramelizes. The name derives from the Breton words for cake ("kouign") and butter ("amann"). Kouign-amann is a speciality of the town Douarnenez where it originated in 1865.
 
I didn't make it straight away like I always do when I've found something new that I'm eager to find out more about it and that's only because my husband, who is a principal consumer of my baked goods, was away ! So I patiently waited until he was back home and made it the day after he arrived.. 
 
However, the first outcome failed to pass my own quality control due to few mistakes made by myself..so nothing to blame! And I didn't wait that long to make the second try..this time with a new recipe that I was sure it wouldn't let me down because it's from David Lebovitz !
 
Anyway, I didn't follow his whole recipe..instead, I mixed and matched between the two recipes with a hope that the result wouldn't be effected by my modification and fortunately, it came out beautifully..top of everything, my husband had two and a half (big) slices even after his (big) dinner!! 
 
I didn't take any photo of the interior texture until the next morning because it was too late by the time I sliced the cake off ( but just in time to serve my husband as a dessert after his dinner!)..so the photos you've seen on this post probably look drier than it really was!
 
Here is what I've done..

1 tablespoon dried yeast, not instant
¾ cup tepid water
2 cups all-purpose flour
½ scant teaspoon salt
3/4 scant cup of sugar (which will be divided later) (Plus additional sugar for rolling out the pastry)
125g salted butter, cut into thinly slices and chilled
2-3 tablespoons additional salted butter, melted

Method:

1. In a medium bowl, dissolve the yeast in the water with a pinch of sugar. Stir briefly, then let stand for 10 minutes until foamy.

2. Gradually stir the flour and salt. The dough should be soft, but not too sticky. Lightly dust your countertop with flour and transfer the dough onto it.Knead the dough with your hands until the dough is smooth and elastic, about  5-10 minutes. If the dough is very sticky, knead in just enough flour, one tablespoon at a time, until the dough doesn’t stick to your hands.

3. Brush a medium bowl with melted butter, put the dough ball into the bowl. Cover, and let rest in a warm place for 1-2 hour. On a lightly floured surface, flatten the dough out to a rectangle at least 30 cm long x 15 cm wide (12 inches x 6 inches). Thinly slice the butter and divide it into 3 equal portions. Place 1 portion, in pieces, over half to two-thirds of the length of dough. Sprinkle with about ¼ cup of the sugar. Fold a third of the dough into the centre over the butter, and then fold the other flap over that, like folding a letter. Flatten the dough out again into a rectangle and repat with butter and sugar and fold again into thirds, as before.. Place on the plastic wrap-covered dinner plate and chill for 1 hour.

4. Lightly grease a 23cm/9 inch pie plate/dish. Remove dough from refrigerator. Flatten once more, and then repeat with butter only. The dough will feel soft and the butter may be breaking through a little. Don’t worry.
Roll dough into a circle about the size of the baking pan. Plaec the dough in the plate and flatten it once more, pressing it in the sides with your fingertips to form a round and let rest in the refrigerator for 30 minutes.
 
5. Pre-heat the oven to 220C/430F. Take out the dough from the fridge and let it rest for a while. Before baking, brush the melted butter over the cake and sprinkle with the last of the sugar.Bake for 20-25 minutes until very golden brown. Both the top and bottom of the cake will have a caramelised surface. Let cool for at least 30 minutes, and serve cut into wedges.


This Kouign-amann has also been posted to yeastspotting hosted by Susan of Wild Yeast.

Sunday, September 12, 2010

Nutella Brownies

I have recently bought a heart-shape silicone cake mold due to my daughter's encourage ( in fact, force!) despite of having no idea what to do with it apart from letting her play with it as a toy!

Fortunately, this nutella brownie came as a knight on a white horse at the right time  ..not only it was great to be baked in my new toy but also it's super duper easy to make even for a nearly 5 years old kid !

Once I read through the recipe..I immediately asked my daughter if she wanted to make a brownie using our new heart-shape mold and she said yes without a hesitation..so we went into the kitchen and what I really did is to measure things and add them to the bowl..the rest was under my daughter's control! She even managed to create an idea of adding some chocolate chips into the batter instead of hazelnut we happened to run out of !

We waited for 10 minutes before taking the brownie out of the oven..and my daughter showed a strong eagerness to find out how delicious her first baked good was! At the end, I failed to stop her from ripping the cooling brownie off , so I simply watched them gone....into her tummy!!    Yummm, my dear gal..

The recipe (adapted from here)

Ingredients

1/2 cup Nutella spread

1 large egg

5 tablespoons all purpose flour

handful of chocolate chips

Method

1. Preheat oven to 350 degrees. Line or grease mini cupcake/muffin pan.

2. Put the Nutella and egg in a medium bowl and whisk until smooth and well blended. Add the flour and whisk until blended. Stir in the chips.

3. Spoon the batter into the prepared muffin tins. Bake about 10 to 12 minutes. Set on a rack to cool completely.


Wednesday, September 8, 2010

Barazik (Syrian Sesame and Pistachio Cookies)

I didn't know anything about Syria at all and nothing involved with this country ever came through my mind! However, my attention was immediately caught when I saw the photo in food&travel magazine and even more when I found out what it really is..you can easily guess what I did next straight away!!

Since I had no experience in these cookies, so I'm not sure if the recipe I've used is authentic. Anyway, they were easy to make and didn't take that long to have my first bite on it! As a nut lover, I knew this cookie wouldn't let me down even before I tasted it but it turned out even better.. Lightly sweet nutty topping along with mild crunchy, yet soft cookie base...it's hard to explain and I think the best to know how it tastes is to try it yourself !!


Sunday, September 5, 2010

Rotiboy (aka Mexican Bun)

I've made many kinds of bread that are from everywhere around the world but surprisingly, I'd falied to make this bread that is very well-known as Rotiboy (the generic name of the mexican bun recipe it was based on) in Malaysia and some other countries! So I opted for it when I felt like it's time to make a bread again..

Given a softness of bread provided by water roux method , I didn't think twice to use the other method to make a dough base while I did some search for the filling and topping. Everything went well from the start to the end ( although there's some filling leaked out from few buns during baking ) and the baked buns looked just like it's supposed to be!

And the taste?? ...  My husband had two freshly baked buns for his afternoon teatime and he requested some more for his lunch on the next day..I think it's needless to say about how it tasted!!

Recipe

dough:

285g bread flour

40g caster sugar

12g milk powder

1/2 tsp salt

6g instant yeast

one egg, lightly beaten

65ml water

75g water roux (tangzhong)

45g unsalted butter, softened

 Filling


• 130 g salted butter, softened

• 1/3 teaspoon vanilla flavoring

• 45  g brown sugar

Topping

• 130 g butter, softened

• 100 g icing sugar, sifted

• 2 large eggs, lightly beaten

• 2/3 teaspoon coffee flavoring (available from bakery supplies shop, You can use 2 tablespoons instant coffee powder dissolved in 1)

• 130 g all-purpose flour, sifted 

For The Filling:.

1. Beat butter in electric mixer on medium speed with the paddle attachment for three minutes.

2. Blend in vanilla essence and brown sugar.

3. Spoon mixture into bowl and refrigerated until firm.

4. Divide mixture into 20 g portion into ball. Keep refrigerated until ready to use.

For the topping:.

1. Beat butter and icing sugar in electric mixer with the paddle attachment on medium speed for five minute until mixture is light and fluffy.

2. Gradually beat in eggs.

3. Mix in coffee flavouring.

4. Sift flour onto mixture and mix on low speed until combined.

5. Refrigerate until ready to use.

For the dough:

Mix all ingredients except the butter in the bowl and using a dough hook on low speed to form a ball. Add the butter bit by bit and mix until incorporated. Increase to a medium speed and knead the dough unitl smooth and elastic about 15-20 minutes. Place the dough into a lightly oiled bowl, cover with plastic wrap and let it rise until doubled in volume.


To shape the buns:.

• Divide the dough into ten pieces and shape each to form a ball. Flatten a ball of dough with the palm of your hand.

• Place a ball of filling in the centre of the dough.

• Gather the edge and pinch to seal. (Be sure to seal well or the filling will leak out during baking.)

• Pat into shape and place on a greased baking tray.

• Repeat with remaining portions of dough.

• Place each bun about 7.5 cm apart on the baking trays.

• Prove for 45 min in a warm place.

• Pipe the topping on the buns in a spiral, starting from the centre.

• Bake in preheated oven at 200 deg C for 12 to 15 min or until buns are lightly brown.


Ps. this bread has been sent to yeastspotting hosted by Susan of Wild Yeast.

pepsakoy

Saturday, September 4, 2010

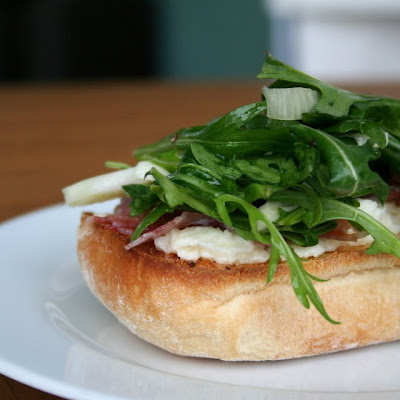
Mozzarella & Salami Ciabatta

It's not often ( in fact, rarely!) that my husband would ask me to make/cook something for his meal. I ( one who tries hard to be a good wife ) then couldn't find any excuse to say no when he spotted this ciabatta in the magazine the other day and asked me if he could have this dish for lunch!

Fortunately, it is so easy to prepare and top of everything, it seemed to cure his hangover better than bread and cheese that I always serve at lunchtime !!

You could find the recipe from here.  


Friday, September 3, 2010

Hazelnut and Zucchini Fruitcake

I hadn't made a fruitcake for such a long time eventhough it's one of my favorite cakes. And when I saw this cake in bbcgoodfood magazine, I was really tempted to make one not only due to the reason above but also because it's not just a basic fruitcake! Apart from mixed dried fruit as a basic ingredient, the recipe also calls for the other two ingredients which are zucchini and apple that simply made me interested in this fruitcake and there was no chance for me not to give it a try !

Typically, I modified the recipe by using a different method to prepare the batter which I opted for a standing mixer to make the batter instead of a food processor because I found myself feel uncomfortable to use it from my first experience. Anyway, there's actually nothing complicated to make the cake in my way..jut like normal way to make a basic cake..cream butter with sugar, then add eggs ,vanilla and mix in the dried mixture and finish with veg. and fruit but you might need more time in the oven to get it done like I did..

How's the cake??.. I don't know..lol..I haven't had a chance to taste it yet!! What I did is to give some away to people around me and have kept some for my husband..What I believe is that it must be delicious or else it wouldn't have been published to people around the world!

Recipe (adapted from here)

225g soft, unsalted butter , plus a little extra for the tin

100g bag blanched hazelnuts , half very roughly chopped

150g light muscovado sugar

225g self-raising flour

3 eggs

1 tsp vanilla extract

1 tsp mixed spice

1 tsp ground cinnamon

1 tsp baking powder

1/4 tsp salt

175g courgettes , coarsely grated

1 eating apple , grated (about 85g/3oz flesh)

250g mixed dried fruits

Method :

1. Heat oven to 180C/160C fan/gas 4. Butter a deep, 20cm round cake tin and line the base and sides with baking parchment. Put the whole hazelnuts, plus 1 tbsp each of the sugar and flour, into a food processor and whizz until the hazelnuts are as fine as you can get them. In a mixing bowl, whisk together the hazelnuts mixture, remaining flour, baking powder, salt and spices and set aside.
2. In the bowl of your electric mixer (or with a hand mixer), beat the butter and sugar until light and fluffy. Beat in eggs, one at a time, making sure to beat well after each addition. Add the vanilla and beat until incorporated. Scrape down the sides of the bowl as needed. Add the dry ingredients to the egg mixture and beat until incorporated then stir in the grated courgettes, apple and dried fruit.

3. Spoon the mix into the tin, smooth the top, then scatter with the chopped hazelnuts, pressing them into the batter a little. Bake for 1 hr 10 mins ( mine needed 15 more minutes ), covering the top loosely with foil after 45 mins, until the cake is risen and golden. Cool in the tin for 20 mins, then remove and cool on a wire rack.